
Mera Peak, situated in the Solu-Khumbu region of Nepal, is a significant and widespread mountain in the Himalayas that is famous for its accessible climbing routes. The Mera Peak route map is essential for colorful climbers who want to scale the summit, as it explains the routes through the valleys and high elevations. At a height of 6476 meters (21408 feet) above sea level, Mera Peak is among Nepal’s trekking peaks and offers glimpses of Makalu, Lhotse, and Everest.
As one of the tallest trekking peaks, Mera Peak presents a significant yet attainable challenge for adventure enthusiasts. The climb does not require advanced technical skills, making it suitable for climbers with essential mountaineering experience. Using a detailed Mera Peak climbing route and following a well-planned Mera Peak trek itinerary is crucial for a successful ascent.
The first recorded ascent of Mera Peak was in 1953 by Col. Jimmy Roberts and Sen Tenzing, who pioneered the route for future climbings. Since then, the peak has become a popular destination for those seeking high-altitude trekking experiences in Nepal. Understanding the Mera Peak altitude and proper acclimatization strategies are vital components outlined in any reputable Mera Peak trekking guide.
Why Climb Mera Peak?
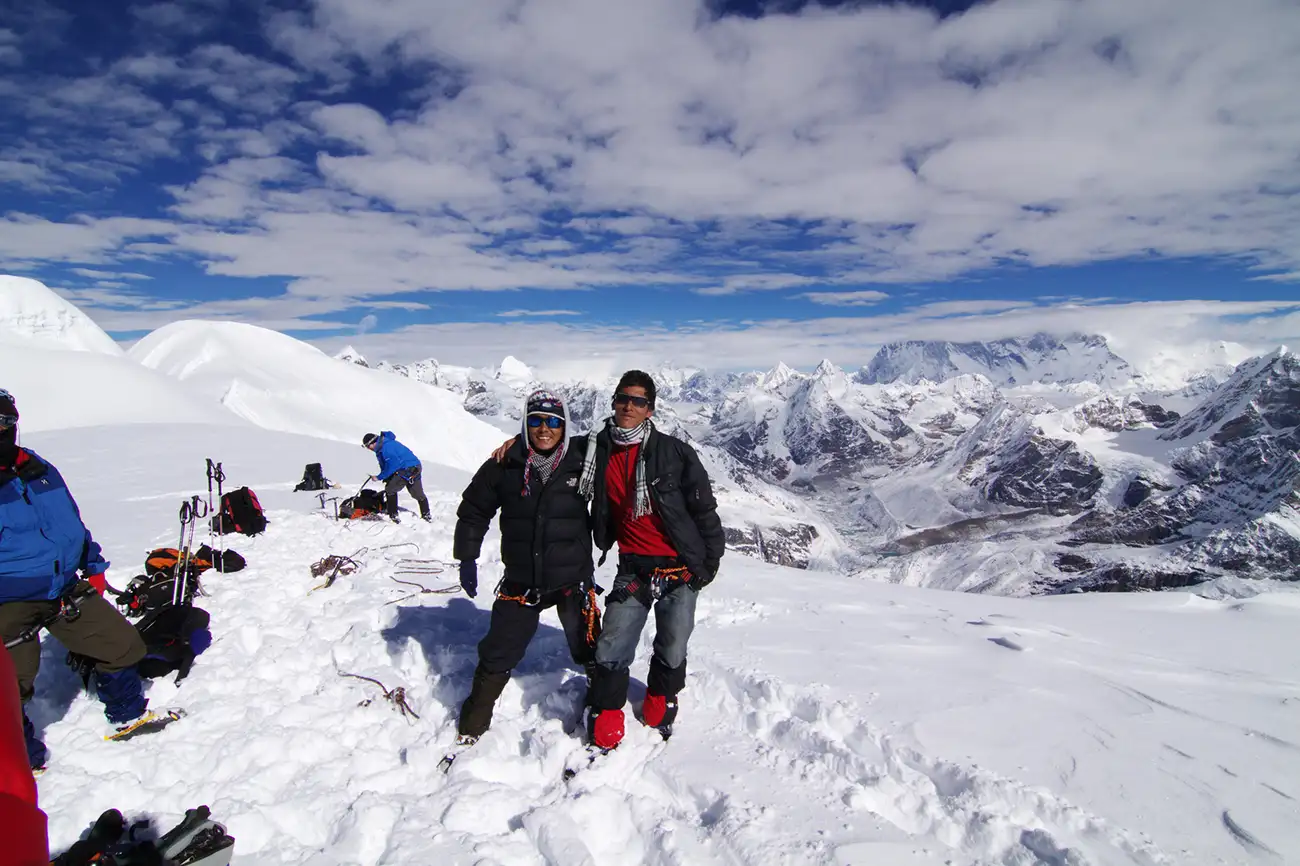
Mera Peak is a beacon for trekkers seeking both challenge and breathtaking scenery in Nepal. The Mera Peak route map guides adventurers through diverse landscapes, culminating in panoramic views of some of the world’s highest mountains. From the summit, climbers witness the grandeur of Everest, Lhotse, and Makalu, all towering above 8,000 meters.
Highlights of the Trek
- Unparalleled Panoramic Views: The ascent offers unobstructed vistas of Everest, Lhotse, Cho Oyu, Makalu, and Kanchenjunga. These sights are among the most awe-inspiring in the Himalayas.
- Diverse Landscapes: Trekkers traverse lush forests, remote villages, and high-altitude glaciers. The Mera Peak climbing route showcases the region’s rich biodiversity.
- Cultural Experiences: Interactions with local Sherpa communities provide insights into Nepalese culture and traditions.
Appeal for Novice and Experienced Climbers
Mera Peak is unique in its accessibility to both novice and seasoned mountaineers. For beginners, it is an introduction to high-altitude climbing without needing advanced technical skills. The Mera Peak trek itinerary usually includes ample acclimatization, making the ascent manageable. Experienced climbers find Mera Peak appealing due to:
- Altitude Challenge: At 6,476 meters, it tests physical endurance and acclimatization techniques.
- Preparation for Higher Summits: It’s an excellent training ground for those aiming for peaks like Everest or Lhotse.
- Remote and Less Crowded Trails: Compared to other treks in Nepal, the routes are less congested, offering a more solitary and immersive experience.
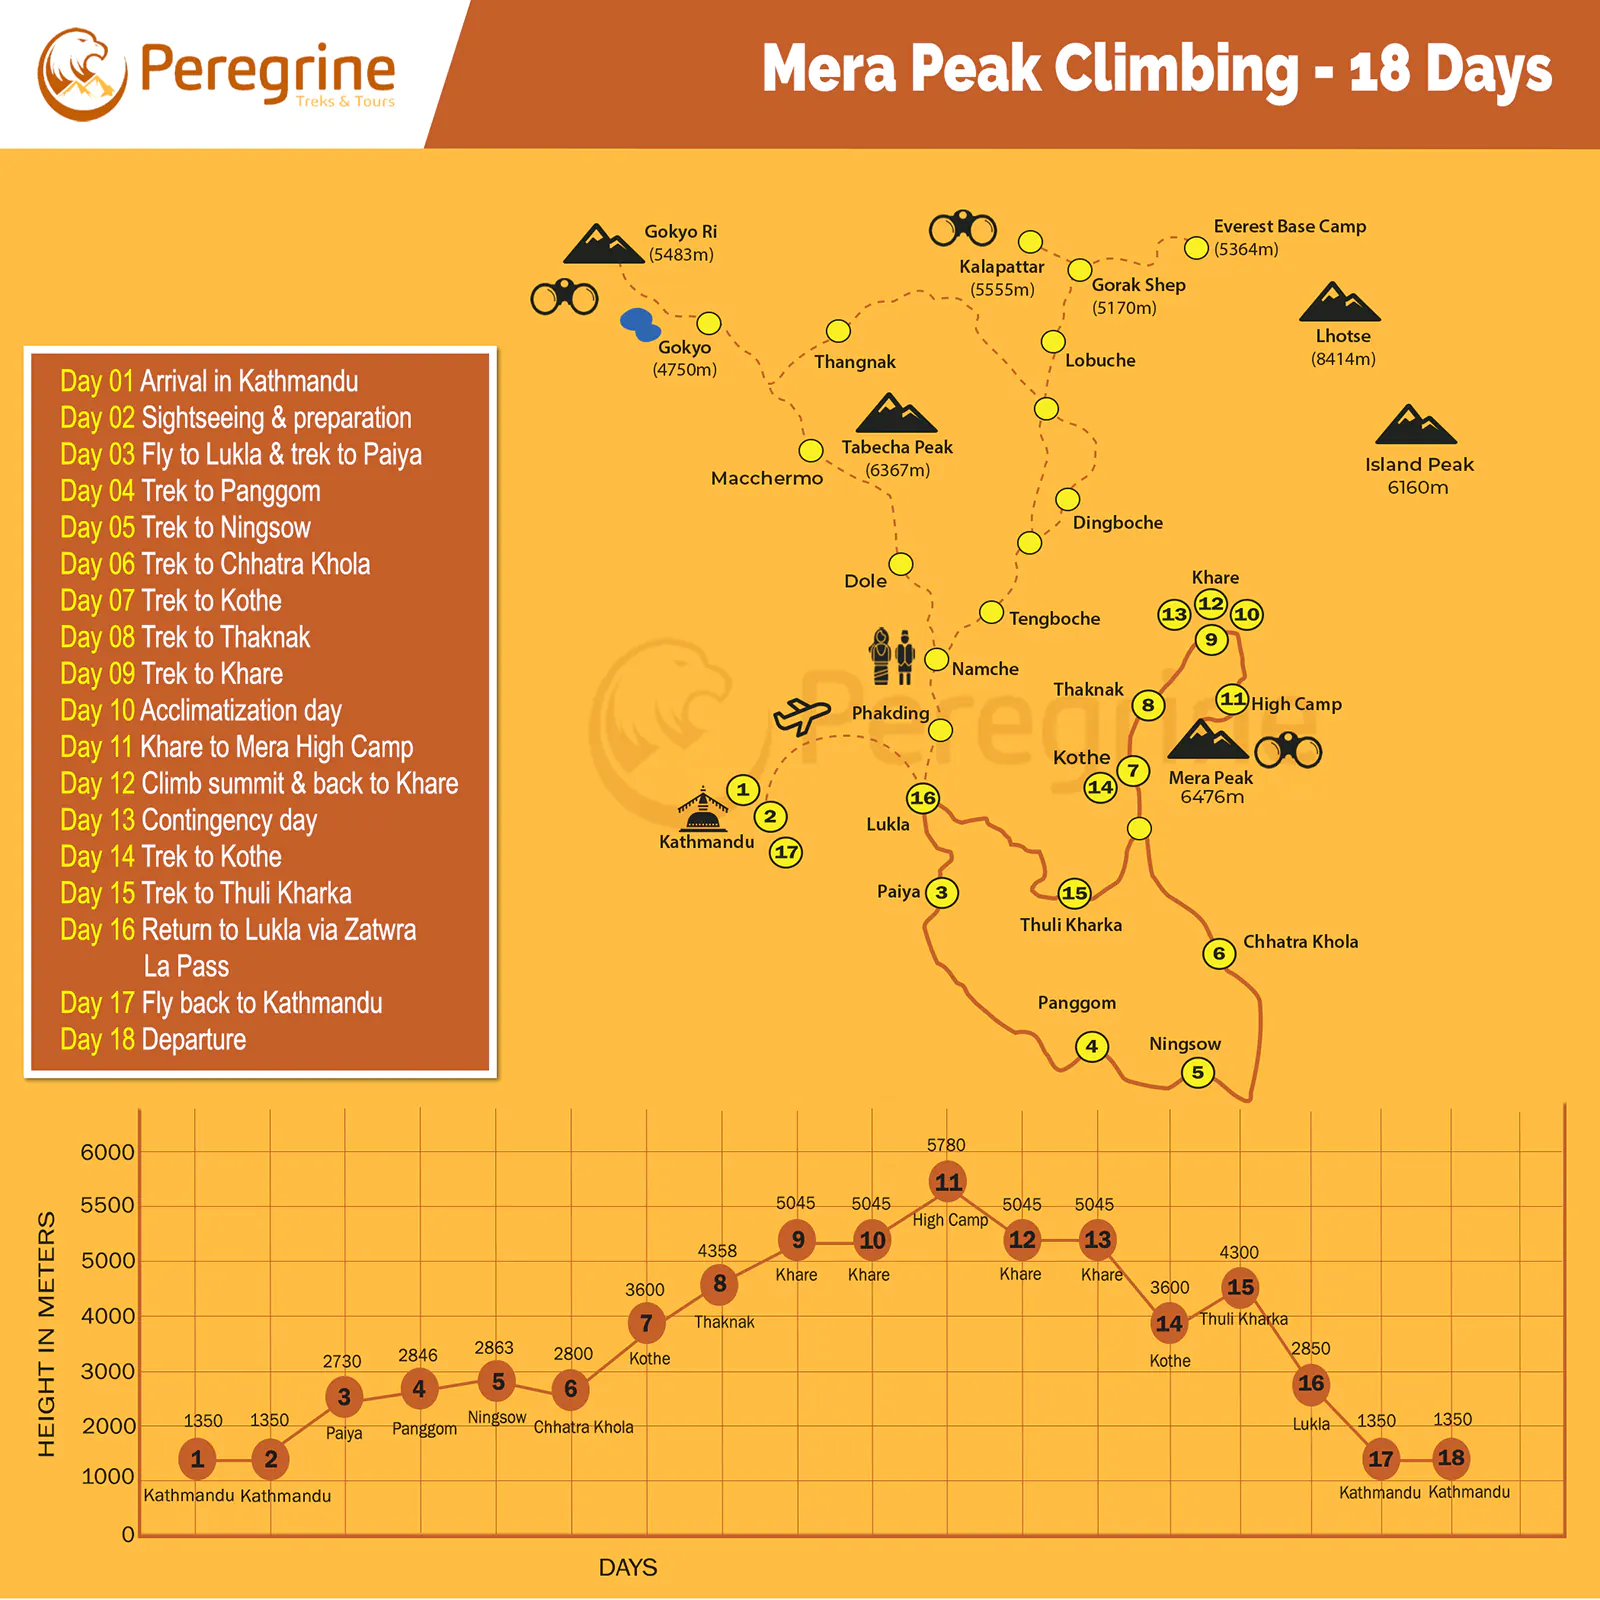
Overview of the Route from Lukla to Mera Peak Summit
The ascent to Mera Peak begins in Lukla, a bustling town at 2,860 meters that serves as the gateway to the Everest region. The Mera Peak route map guides trekkers through serene valleys, dense forests, and over high mountain passes, ultimately reaching the summit at 6,476 meters. This route combines rich cultural encounters with stunning natural beauty, creating unforgettable moments on any Mera Peak Climbing.
Key Stops and Elevation Changes
Understanding the key stops and elevation changes is crucial for a successful climb. Below is a detailed outline of the Mera Peak climbing route:
1. Lukla (2,860m) to Paiya (2,730m)
- Distance: Approximately 8 km
- Highlights: Descending paths through rhododendron forests views of the Dudhkoshi River.
2. Paiya to Panggom (2,846m)
- Elevation Gain: +116 meters
- Features: Crossing the Kari La Pass, encountering local Sherpa villages.
3. Panggom to Ningsow (2,863m)
- Elevation Gain: +17 meters
- Terrain: Mixed trails with gentle ascents and descents.
4. Ningsow to Chhatra Khola (2,800m)
- Elevation Change: -63 meters
- Notes: Trek through the Makalu Barun National Park, which is rich in biodiversity.
5. Chhatra Khola to Kothe (3,691m)
- Elevation Gain: +891 meters
- Scenery: Trekking alongside the Hinku River, views of Mera Peak.
6. Kothe to Thaknak (4,358m)
- Elevation Gain: +667 meters
- Environment: Alpine meadows, glacial streams.
7. Thaknak to Khare (5,045m)
- Elevation Gain: +687 meters
- Acclimatization: It is crucial to rest stop to adjust to the Mera Peak altitude.
8. Khare to Mera Base Camp (5,350m)
- Elevation Gain: +305 meters
- Terrain: Rocky trails, introduction to snow paths.
9. Mera Base Camp to High Camp (5,780m)
- Elevation Gain: +430 meters
- Preparation: Final preparations for the summit push.
10. High Camp to Mera Peak Summit (6,476m) and back to Khare
- Elevation Gain: +696 meters to summit
- Descent: Return to Khare after reaching the summit.
- Highlights: Sunrise over the Himalayas, panoramic views of Everest, Lhotse, and Makalu.
Alternative Routes and Variations
While the standard route is popular, there are alternative paths on the Mera Peak route map:
Via Zatra La Pass (4,610m)
- Description: A more direct but challenging route starting from Lukla.
- Pros: Shortens the trek by a few days.
- Cons: Steeper ascents require better acclimatization due to rapid elevation gain.
Hinku Valley Route
- Description: Follows the traditional path through the remote Hinku Valley.
- Pros: Gradual elevation changes are better for acclimatization.
- Cons: Longer duration, requires more days of trekking.
Combined Amphu Lapcha Pass and Mera Peak Trek
- Description: An extended trek that includes crossing the Amphu Lapcha Pass (5,845m) after summiting Mera Peak.
- Pros: Adds adventure by combining two high passes.
- Cons: Demands high fitness levels and technical skills.


Day-by-Day Itinerary
Planning your ascent using the Mera Peak route map ensures a well-organized and successful climb. Below is a comprehensive day-by-day itinerary detailing distances, trekking hours, and altitudes to help you prepare for this exciting adventure.
Day 1: Arrival in Kathmandu (1,400m)
- Activities: Settle into your hotel and rest after your flight.
- Notes: Prepare necessary documents and equipment for the trek.
Day 2: Kathmandu Sightseeing and Trek Preparation
- Activities: Visit UNESCO World Heritage Sites like Pashupatinath and Boudhanath.
- Notes: Finalize permits and check your gear.
Day 3: Flight to Lukla (2,860m) and Trek to Paiya (2,730m)
- Flight Duration: 35 minutes to Lukla.
- Trekking: 5-6 hours, covering approximately 8 km.
- Terrain: Descend through forests and cross small streams.
- Highlights: First glimpse of the Himalayan landscape.
Day 4: Paiya to Panggom (2,846m)
- Trekking: 5-6 hours over 12 km.
- Elevation Gain: +116 meters.
- Terrain: Cross the Kari La Pass and walk through rhododendron forests.
- Highlights: Views of Dudhkoshi River and traditional Sherpa villages.
Day 5: Panggom to Ningsow (2,863m)
- Trekking: 4-5 hours, covering about 9 km.
- Elevation Gain: +17 meters.
- Terrain: Gentle ascents and descents.
- Highlights: Interaction with local communities.
Day 6: Ningsow to Chhatra Khola (2,800m)
- Trekking: 7-8 hours over 12 km.
- Elevation Change: -63 meters.
- Terrain: Trails through the Makalu Barun National Park.
- Highlights: Diverse flora and fauna.
Day 7: Chhatra Khola to Kothe (3,691m)
- Trekking: 6-7 hours, approximately 15 km.
- Elevation Gain: +891 meters.
- Terrain: Alongside the Hinku River.
- Highlights: First, there are clear views of Mera Peak.
Day 8: Kothe to Thaknak (4,358m)
- Trekking: 3-4 hours over 7 km.
- Elevation Gain: +667 meters.
- Terrain: Alpine meadows and glacial streams.
- Highlights: Visit to a 200-year-old Lungsumgba Gompa.
Day 9: Thaknak to Khare (5,045m)
- Trekking: 2-3 hours, covering 6 km.
- Elevation Gain: +687 meters.
- Terrain: Steep trails with stunning glacier views.
- Highlights: Acclimatization for higher altitudes.
Day 10: Acclimatization Day in Khare
- Activities: Short hikes to adjust to the Mera Peak altitude.
- Notes: Review climbing techniques and equipment.
Day 11: Khare to Mera High Camp (5,780m)
- Trekking: 5-6 hours over 7 km.
- Elevation Gain: +735 meters.
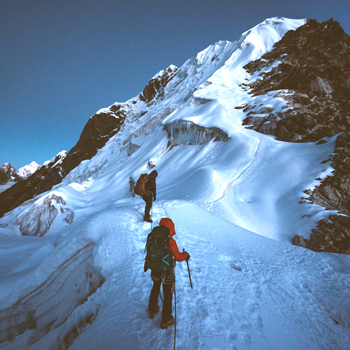
- Terrain: Snow-covered paths requiring crampons.
- Highlights: Panoramic views from high camp.
Day 12: Summit Mera Peak (6,476m) and Descend to Khare
- Climbing: 8-9 hours total.
- Elevation Gain: +696 meters to summit.
- Descent: Return to Khare at 5,045m.
- Highlights: Sunrise over Everest, Lhotse, and Makalu.
- Notes: Start early to reach the summit before noon.
Day 13: Reserve Day for Contingency
- Purpose: Extra day in case of bad weather or needed rest.
- Activities: Rest or explore surrounding areas.
Day 14: Khare to Kothe (3,691m)
- Trekking: 5-6 hours, covering 15 km.
- Elevation Loss: -1,354 meters.
- Terrain: Retrace steps through alpine regions.
- Highlights: Reflect on the successful climb.
Day 15: Kothe to Thuli Kharka (4,300m)
- Trekking: 6-7 hours over 13 km.
- Elevation Gain: +609 meters.
- Terrain: Ascend through forested trails.
- Highlights: Views of Mera North, Central, and South.
Day 16: Thuli Kharka to Lukla via Zatrwa La Pass (4,610m)
- Trekking: 6-7 hours, approximately 18 km.
- Elevation Change: Cross the pass and descend to 2,860m.
- Terrain: Steep descents and rocky paths.
- Highlights: Final views of the Himalayas.
Day 17: Flight Back to Kathmandu
- Flight Duration: 35 minutes.
- Activities: Transfer to hotel and rest.
- Notes: Celebrate the completion of the trek.
Day 18: Departure from Kathmandu
- Activities: Airport transfer for your onward flight.
- Notes: Farewell to Nepal.
Altitude and Acclimatization
Ascending to high altitudes like those found on Mera Peak requires careful planning and awareness. The Mera Peak route map guides trekkers through elevations ranging from 2,860 meters in Lukla to 6,476 meters at the summit. Proper acclimatization is crucial to prevent altitude sickness and ensure a safe and successful climb.
Acclimatize to Prevent Altitude Sickness: A Must-Know
Climbing rapidly without allowing your body to adjust to higher elevations increases the risk of Acute Mountain Sickness (AMS). The Mera Peak climbing route involves significant altitude gains, making acclimatization essential. By following a well-structured Mera Peak trek itinerary, trekkers can minimize health risks and enhance their overall experience.
Acclimatization allows your body to adapt to decreased oxygen levels at higher altitudes. It reduces the likelihood of AMS symptoms, ranging from mild discomfort to life-threatening conditions. Utilizing the Mera Peak route map helps plan rest days and gradual ascents, which are significant components of acclimatization.
Suggested Acclimatization Days and Practices
Incorporating acclimatization days into your itinerary is a best practice endorsed by every reliable Mera Peak trekking guide. Here’s how to effectively acclimatize:
- Scheduled Rest Days: Allocate specific days for acclimatization, such as at Khare (5,045m), where the body adjusts to higher altitudes.
- Gradual Ascent: Follow the “climb high, sleep low” principle. Climb to a higher altitude during the day and descend to a lower elevation for sleep.
- Hydration and Nutrition: To aid your body’s adaptation, keep yourself well-hydrated and nourished with a balanced diet.
- Avoid Alcohol and Smoking: These can exacerbate dehydration and impede acclimatization.
Symptoms and Prevention of Acute Mountain Sickness (AMS)
Understanding AMS is crucial for anyone tackling the Mera Peak altitude challenges. Common symptoms include:
- Headaches
- Nausea and Dizziness
- Shortness of Breath
- Fatigue and Weakness
- Sleep Disturbances
If you experience any of these symptoms while following the Mera Peak climbing route, it’s essential to take immediate action:
- Stop Ascending: Do not go higher until symptoms subside.
- Rest and Hydrate: Take a break and drink fluids.
- Descend if Necessary: If symptoms worsen, descend to a lower altitude promptly.
- Seek Medical Attention: Professional medical help is essential in severe cases.

Permits and Regulations
Navigating the Mera Peak route map requires obtaining specific permits the Nepalese government mandates. These permits ensure the preservation of natural habitats and the safety of trekkers. Below are the essential licenses needed for your Mera Peak Climbing.
Required Permits
1. Sagarmatha National Park Permit
- Purpose: Grants access to the Sagarmatha National Park, which encompasses part of the Mera Peak climbing route.
- Cost: Approximately NPR 3,000 (USD 30) per person.
- Validity: Valid for a single entry during your trekking period.
2. Trekkers’ Information Management System (TIMS) Card
Purpose: Helps authorities keep track of trekkers for safety and rescue operations.
Cost:
- Organized Trekkers (with guide): NPR 1,000 (USD 10) per person.
- Free Individual Trekkers (FITs): NPR 2,000 (USD 20) per person.
Validity: Valid for the duration of your trek.
3. Local Area Permit
- Purpose: Required for specific regions along the Mera Peak trek itinerary, such as the Khumbu Pasang Lhamu Rural Municipality.
- Cost: Approximately NPR 2,000 (USD 20) per person.
Recent Regulatory Changes
As of September 2021, there were proposals to increase permit fees and enforce stricter regulations to promote sustainable trekking. While significant changes have yet to be officially implemented, verifying the latest requirements is crucial before starting your trek. Consulting an updated Mera Peak trekking guide or checking with the Nepal Tourism Board can provide current information.
Best Time to Trek
Selecting the ideal time to follow the Mera Peak route map enhances your trekking experience by offering optimal weather conditions and breathtaking views. The Himalayan climate varies significantly throughout the year, affecting trail accessibility and safety.
Optimal Seasons
Pre-Monsoon (March to May)
Advantages
- Stable Weather: Clear skies and minimal precipitation.
- Flora in Bloom: Rhododendrons and other wildflowers adorn the trails.
- Longer Daylight Hours: More time for trekking each day.
Considerations
- Increasing Heat: Temperatures rise toward May, especially at lower altitudes.
- Crowded Trails: Popular season may lead to busier paths.
Post-Monsoon (September to November)
Advantages
- Crisp Air and Clear Views: Post-monsoon skies offer spectacular mountain vistas.
- Comfortable Temperatures: Mild weather makes trekking pleasant.
- Festive Atmosphere: Experience local festivals like Dashain and Tihar.
Considerations
- Cold Nights: Temperatures drop significantly at higher altitudes.
- Possible Trail Damage: Monsoon rains may have affected some paths.
Weather Patterns and Their Impact on Trekking Conditions
Understanding seasonal weather patterns is vital for planning your Mera Peak trek itinerary.
Monsoon Season (June to August)
- Heavy Rainfall: Trails become slippery and prone to landslides.
- Leeches and Insects: Increased presence due to moisture.
- Cloudy Skies: Obstructed Mountain views.
- Recommendation: Generally, trekking is not advised during this period.
Winter Season (December to February)
- Extreme Cold: Temperatures can plummet below -20°C at night.
- Heavy Snowfall: Trails and passes may be blocked.
- Short Daylight Hours: Less time to cover daily distances.
- Recommendation: Suitable only for experienced trekkers prepared for harsh conditions.
Temperature Ranges and Daylight Hours
Pre-Monsoon Temperatures
Lower Altitudes (up to 3,000m)
- Day: 10°C to 20°C
- Night: 5°C to 10°C
Higher Altitudes (above 4,000m)
- Day: -5°C to 5°C
- Night: -10°C to -15°C
Post-Monsoon Temperatures
Lower Altitudes
- Day: 10°C to 15°C
- Night: 0°C to 5°C
Higher Altitudes
- Day: -5°C to 5°C
- Night: -15°C to -20°C
Daylight Hours
- Pre-Monsoon: Approximately 12 to 13 hours of daylight.
- Post-Monsoon: Around 11 to 12 hours of daylight.
Physical Preparation and Training
Preparing for Mera Peak requires a solid fitness foundation. The route map highlights the demanding terrain and high altitudes you’ll encounter. Novice and experienced climbers should enhance their physical and mental readiness before tackling this adventure.
Recommended Fitness Level and Prior Experience
- Fitness Level: Aim for a high level of cardiovascular endurance. Activities like running, cycling, and swimming can boost your stamina.
- Prior Experience: While technical climbing skills are not mandatory, previous high-altitude trekking experience is beneficial. Familiarity with multi-day hikes prepares you for the challenges the Mera Peak trekking guide suggests.
Training Routines Focusing on Endurance, Strength, and Cardiovascular Fitness
To conquer the elevations detailed in the Mera Peak climbing route, incorporate the following into your training:
Endurance Training
- Long-Distance Hiking: Practice hikes carrying a backpack similar in weight to what you’ll carry on the trek.
- Interval Training: Include activities alternating between high and low intensity to improve stamina.
Strength Training
- Leg Workouts: Squats, lunges, and step-ups strengthen muscles used during ascents and descents.
- Core Exercises: Planks and sit-ups enhance balance and stability on uneven terrains.
Cardiovascular Fitness
- Aerobic Activities: Running, swimming, or cycling at least three times a week boosts heart and lung capacity.
- High-Intensity Interval Training (HIIT): Short bursts of intense exercise improve oxygen utilization, which is crucial at high altitudes like the Mera Peak altitude.
Mental Preparation Tips
The mental demands of the Mera Peak Climbing are as significant as the physical ones. Prepare mentally by:
- Visualization Techniques: Imagine successfully navigating the Mera Peak route map and reaching key milestones.
- Mindfulness and Meditation: Practices that enhance focus can help manage stress and fatigue during the trek.
- Set Realistic Goals: Understand the challenges ahead and set achievable targets to maintain motivation.
Equipment and Gear List
Having the right equipment is essential when following the Mera Peak route map. Your chosen gear can significantly improve your comfort and safety throughout the trek.
Essential Trekking Gear
Boots: Ensure your trekking boots are sturdy, waterproof, and provide adequate ankle support.
Clothing Layers
- Base Layer: Moisture-wicking thermal underwear.
- Mid Layer: Insulating fleece or down jackets.
- Outer Layer: Waterproof and windproof outerwear.
Backpack: A durable pack (50-65 liters) to carry personal items, with a rain cover for protection.
Accessories
- Gloves and Socks: Thermal and moisture-wicking options.
- Headwear: Warm hat and a sun-protective cap.
- Sunglasses: UV protection is crucial at high altitudes.
Climbing Equipment
- Crampons: Essential for icy sections depicted on the Mera Peak climbing route.
- Ice Axe: For balance and self-arrest on snowy slopes.
- Harness: Required for glacier travel and potential crevasse rescue.
- Ropes: Your guide usually provides these, but confirm beforehand.
- Helmet: Protects against falling debris and during climbs.
Advice on Renting vs. Buying Gear in Kathmandu or Lukla
Renting Gear
Pros
- Cost-Effective: Ideal for items you might not use again, like crampons or ice axes.
- Convenience: Shops in Kathmandu and Lukla offer a wide range of equipment.
Cons
- Quality and Fit: Rental gear may not fit perfectly or be the highest quality.
- Limited Availability: The best gear may be rented out during peak seasons.
Buying Gear
Pros
- Personal Fit: Ensures comfort, especially for boots and clothing.
- Long-Term Investment: Useful if you plan future treks or climbs.
Cons
- Higher Initial Cost: Purchasing equipment is more expensive upfront than renting.
- Logistics: Adds to luggage weight when traveling.
Tips
- Essential Personal Items: It’s recommended to bring your boots and clothing layers for comfort and hygiene.
- Specialized Equipment: Consider renting technical gear like crampons and ice axes in Kathmandu to reduce travel weight.
Challenges and Safety Considerations
Climbing Mera Peak presents several challenges that require careful preparation and awareness. The Mera Peak route map highlights various terrains and altitudes, and understanding these is crucial for a safe ascent.
Potential Hazards
- Crevasses: The glaciers along the Mera Peak climbing route contain hidden crevasses. Proper equipment, such as ropes and harnesses, and experienced guides who know the terrain well are essential.
- Changing Weather: Weather in the Himalayas is unpredictable. Sudden snowstorms, high winds, or heavy rainfall can impact visibility and trail conditions. Always be aware of the weather forecast and have appropriate equipment on hand.
- Altitude Sickness: The trek reaches elevations up to 6,476 meters. Altitude sickness is a significant risk, so proper acclimatization and monitoring for Acute Mountain Sickness (AMS) symptoms are vital.
Importance of Hiring Experienced Guides and Porters
- Local Expertise: Guides familiar with the Mera Peak route map can navigate challenging sections efficiently and safely.
- Safety Measures: Experienced guides are trained in first aid and emergency protocols, providing an added layer of security.
- Load Management: Porters can carry heavy equipment, allowing you to focus on the climb and reduce fatigue.
Emergency Protocols and Evacuation Procedures
- Communication: Ensure your team has reliable communication devices like satellite phones, especially since network coverage is sparse.
- Evacuation Plans: Discuss emergency evacuation procedures with your guide before starting the trek. Know the nearest evacuation points marked on the Mera Peak map.
- Insurance: Get travel insurance for high-altitude trekking and helicopter rescues.
Accommodation and Facilities
Understanding the accommodation options and available facilities along the Mera Peak route map can enhance your trekking experience.
Types of Lodging: Teahouses vs. Camping
Teahouses
- Description: Basic lodges offering meals and a place to sleep.
- Availability: Limited along the Mera Peak trekking route, mainly in lower villages.
- Facilities: Tea houses typically offer communal dining areas, shared bathrooms, and minimal amenities.
Camping
- Description: Setting up tents at designated camping spots.
- Flexibility: Allows personalized schedules according to your Mera Peak trek itinerary.
- Requirements: Additional gear and possibly more porters are required to carry equipment.
Availability of Food and Water Purification Methods
Food
- Teahouses: Serve simple meals like dal bhat, noodles, and soups.
- Camping: A cook usually accompanies the team to prepare meals.
Water Purification
- Methods: Use purification tablets, filters, or boil water.
- Advice: Always purify water from natural sources to prevent illness.
Electricity and Charging Facilities, Communication Networks
Electricity
- Teahouses: They may offer charging facilities for a small fee, but power can be unreliable.
- Camping: No electricity; consider bringing portable chargers or solar panels.
Communication Networks
- Mobile Coverage: Limited and often unavailable at higher altitudes.
- Satellite Phones: Recommended for emergency communication.
- Internet Access: Rarely available; rely on something other than it during your Mera Peak Climbing.
Cultural Experiences
Exploring Mera Peak isn’t just about the stunning landscapes; it’s also an opportunity to experience the rich cultural tapestry of the Himalayas. The Mera Peak route map guides trekkers through villages where Sherpa culture thrives, offering a unique blend of natural beauty and cultural enrichment.
Insights into the Sherpa Culture and Local Communities
The Sherpa people, native to the Everest region, are well-known for their mountaineering skills and welcoming hospitality. As you navigate the Mera Peak climbing route, you’ll pass through several Sherpa settlements like Paiya, Panggom, and Khare. These villages provide a glimpse into a lifestyle that has remained unchanged for centuries.
- Hospitality: Sherpas are known for their friendly demeanor. Visitors are often welcomed with traditional greetings and invited to share in local customs.
- Cuisine: Traditional dishes such as dal bhat (lentil soup with rice) and tsampa (roasted barley flour) offer a taste of the regional diet.
- Art and Music: The communities celebrate with folk songs and dances, especially during festivals.
Monasteries, Festivals, and Traditions Encountered En Route
The trek offers opportunities to visit monasteries and participate in local festivals, deepening your connection with the region.
Monasteries
- Panggom Monastery: It is a spiritual haven that offers insight into Buddhist practices.
- Thaknak Monastery: Offers serenity and a chance to observe daily rituals.
Festivals
- Mani Rimdu: Celebrated in October-November, featuring elaborate dances and prayers.
- Dumji Festival: Marks the birth of Guru Rinpoche with communal feasts and dances.
Traditions
- Prayer Flags: Colorful flags bearing mantras flutter along the trails, symbolizing peace and compassion.
- Chortens: Stupa-like structures that serve as spiritual monuments.
Respectful Interaction and Responsible Tourism Practices
Engaging respectfully with local communities is crucial.
Dress Modestly: Wear appropriate clothing, especially when visiting religious sites.
Learn Basic Phrases: Simple greetings in the Sherpa language can foster goodwill.
Ask Permission: Before photographing people or entering homes, always seek consent.
Support Local Economies
- Purchase Local Goods: Handicrafts and souvenirs contribute to the community’s livelihood.
- Hire Local Guides: Their knowledge enriches your understanding of the Mera Peak route map and culture.
Environmental Considerations
Protecting the pristine environment of the Himalayas is a collective effort. The increasing popularity of the Mera Peak route map necessitates conscientious efforts to minimize ecological impact.
Leave No Trace Principles
Practicing the Leave No Trace principle contributes to the long-term viability of the trekking routes.
Plan and Prepare: Know the regulations and conditions of the Mera Peak trekking guide.
Travel and Camp on Durable Surfaces: Protect the environment by sticking to durable surfaces like trails and campsites.
Dispose of Waste Properly:
- Pack It In, Pack It Out: Return all trash to disposal points.
- Sanitation: Use biodegradable products and proper toilet facilities.
Leave What You Find: Do not remove plants, rocks, or cultural artifacts.
Respect Wildlife: Observe wildlife from afar and refrain from feeding them.
Impact of Trekking on the Local Ecosystem
Trekking can inadvertently harm the environment.
- Soil Erosion: Deviating from trails can damage vegetation and lead to landslides.
- Waste Pollution: Litter contaminates water sources and harms wildlife.
- Resource Depletion: Overuse of firewood contributes to deforestation.
How to Trek Sustainably
Implementing sustainable practices enhances your trekking experience.
Use Reusable Water Bottles: Refilling bottles with purified water minimizes plastic waste.
Purify water Safely: Employ filtration systems or purification tablets to avoid buying bottled water.
Choose Eco-Friendly Gear: Opt for products made from sustainable materials.
Support Sustainable Businesses:
- Stay at Eco-Lodges: Facilities that implement green practices.
- Hire Environmentally Conscious Guides: They prioritize sustainability along the Mera Peak climbing route.
Conserve Energy: Limit the use of electronics and headlamps to essential needs.
Conclusion
Climbing Mera Peak is a fulfilling adventure that culminates in breathtaking views and a profound sense of accomplishment. The detailed Mera Peak route map is critical to navigating this magnificent trek. It guides you through diverse landscapes, from lush forests to towering glaciers, culminating in a panoramic vista of the Himalayas.
Starting on the Mera Peak climbing challenges you physically and mentally, but the experience is unparalleled. You make the most of this incredible opportunity by preparing thoroughly, respecting the mountain environment, and embracing the local culture.
Prospective trekkers should remember that success lies in careful planning and a positive mindset. Utilize reliable resources like the Mera Peak trekking guide, and don’t hesitate to seek advice from experienced climbers. Staying atop Mera Peak is an attainable goal that requires determination and proper preparation.